 League of Legends
 Teamfight Tactics
 Legends of Runeterra
 Valorant
 Lost Ark
 Destiny 2
 Diablo 4
 Download APP
How to Play Annie Jhin
On the release of Worldwalker, one of the first decks to reach the surface was Annie Jhin. Using Jhin’s Origin, the deck basically built itself.
Just throw in all the cards that read “Skill: Deal Damage”, and you’ve got a deck. Besides, when it comes to a new ranked season, Burn is an easy strategy to default to.
Statistically, the deck displayed pretty poor results, but there are a number of players (myself included) that feel there’s a little more than meets the eye.
It’s Trevor “Shugo” Yung here, and today we’re gonna dive a little deeper to explore the intricacies of Annie Jhin.
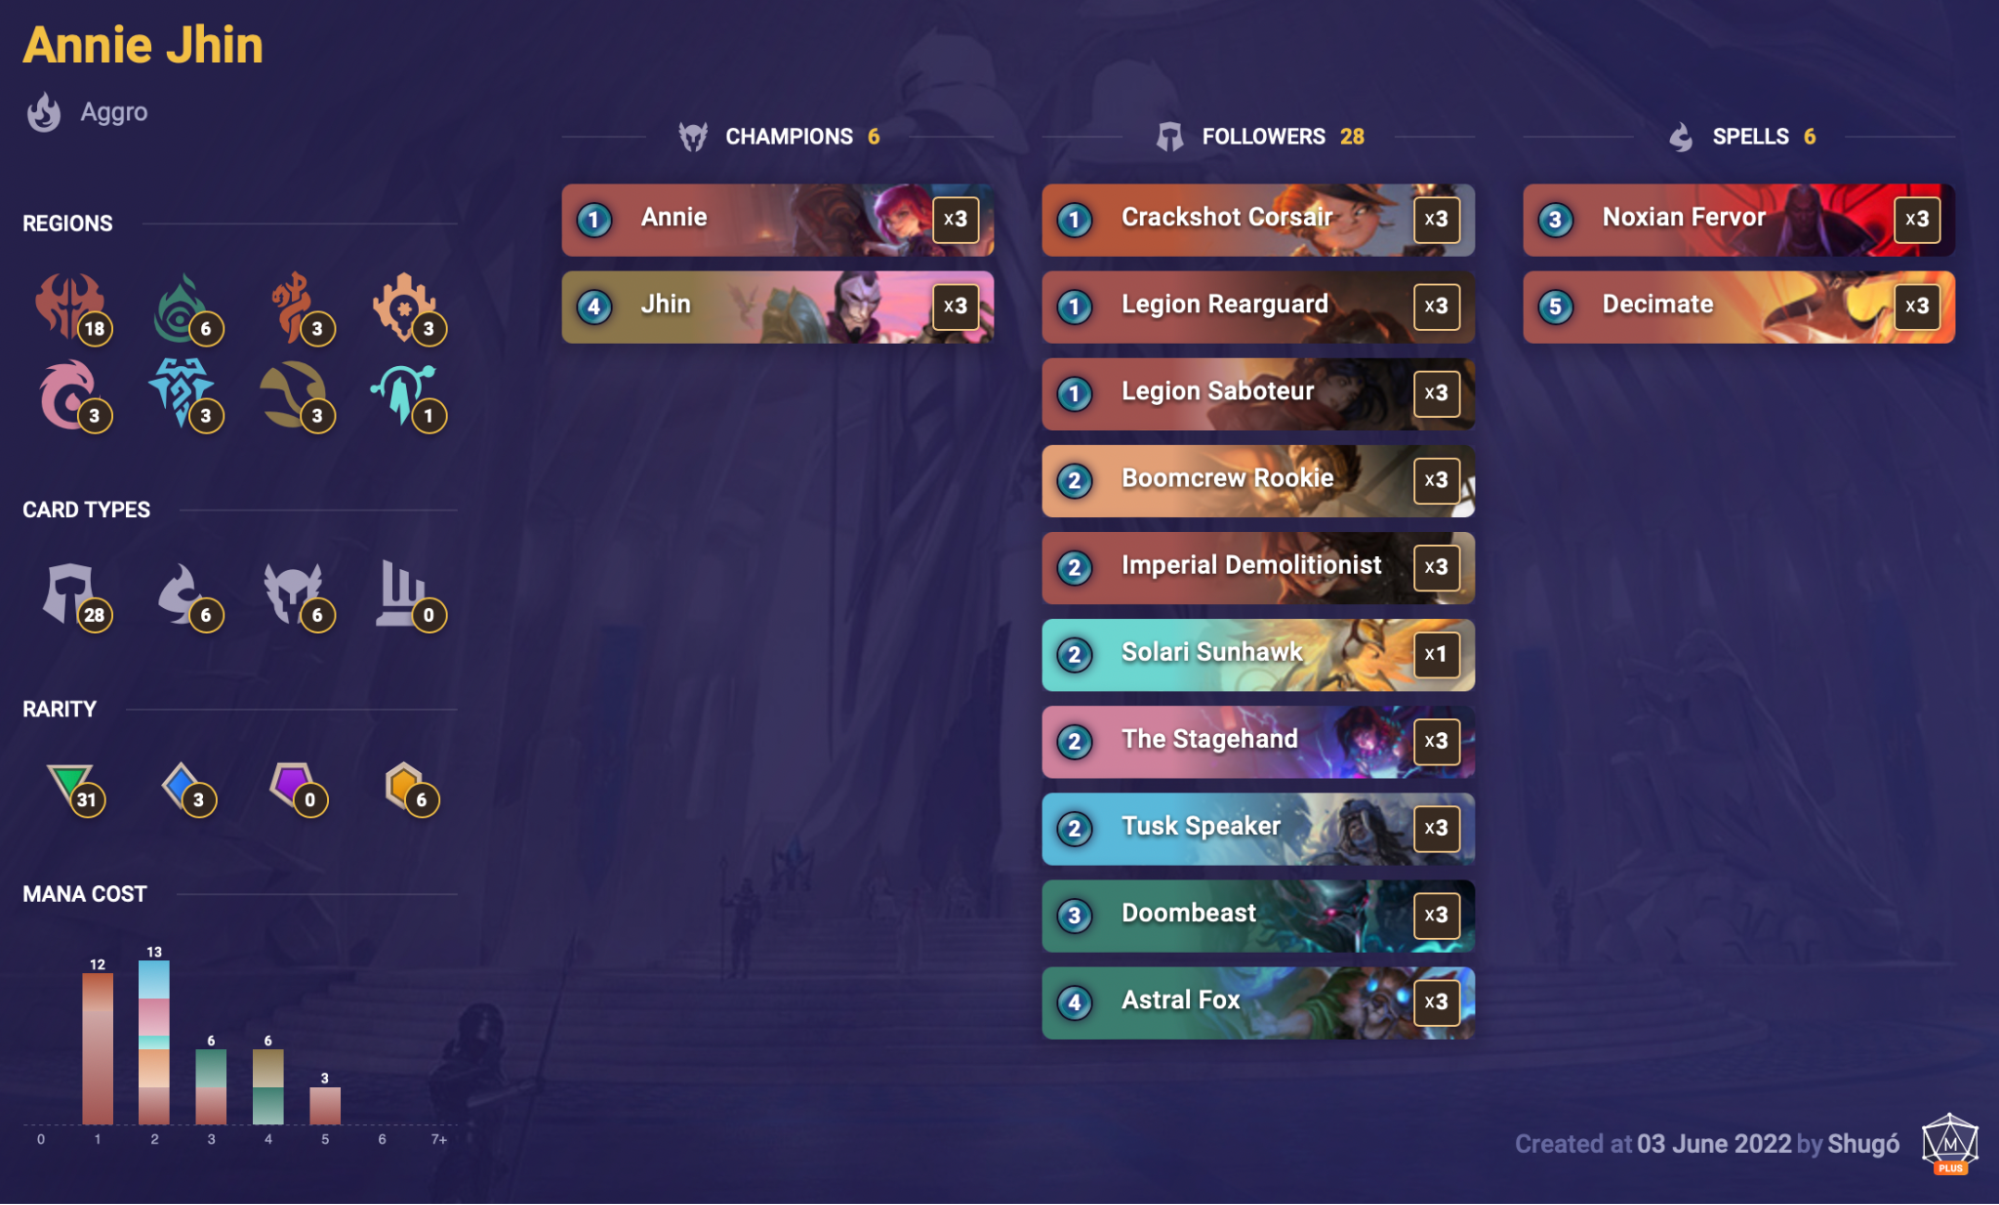
Deck Code: CEFACBQDBQAQEBR4AMAQGAQMFAAQCBBWAIBAGAYEAEDAEAYBAUAQMAIDAUDACBAFBQAQMDACAAAQCBAJBU
Deck Overview
Annie Jhin is a Burn deck; we all know this. But to what extent do you play to its strengths? Simply jamming units to the board may work sometimes, but proper navigation is required in order to output the highest possible damage. Let’s take a look at the key reason for this; Jhin.
Jhin is a menace unlike any other. The ability to deal one Nexus damage every time you activate three skills is unparalleled. This damage is unavoidable, barring the odd counterspell or nearly nonexistent hand disruption. And that’s on top of the fact he lets you break ordinary region restrictions!
This unique gameplay aspect makes sequencing extremely important. Since many skills require you to play a unit, you’ll need to find the ideal window of opportunity. One misstep could mean missing a Lotus Trap trigger, and a single point of damage can be the difference between winning or losing. Who says Burn doesn’t take skill?
Mulligan Strategy
One of the most common mistakes is not knowing how to mulligan. Many players default to just keeping any 1-drops and 2-drops, but in reality, there are specific units that play out favorably in each matchup. That’s why some games feel like a blowout while others feel unwinnable. A proper mulligan is half the battle. Let’s start by evaluating our 1-drops.
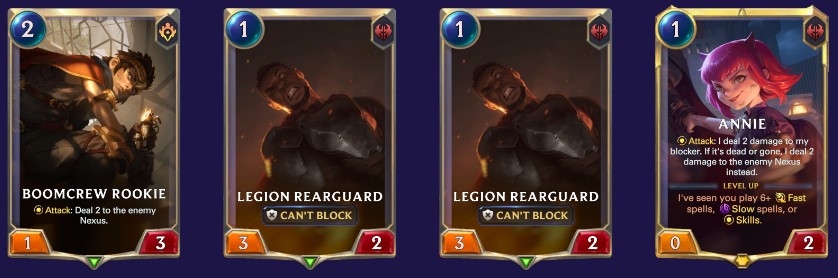
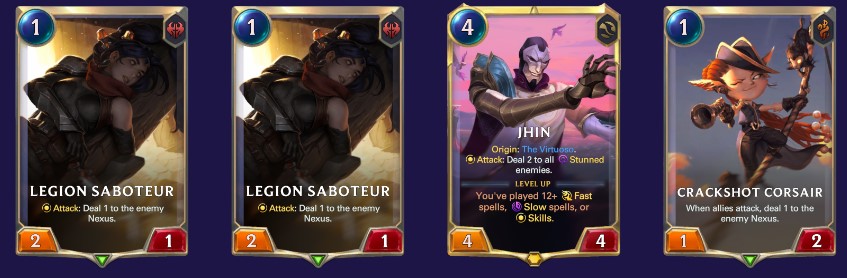
- Annie: Annie is one of the best aggressive 1-drops in the game, but she does have a huge weakness; challengers. She’s worth keeping against everything except Demacia. Don’t let her be fed to Broadwing.
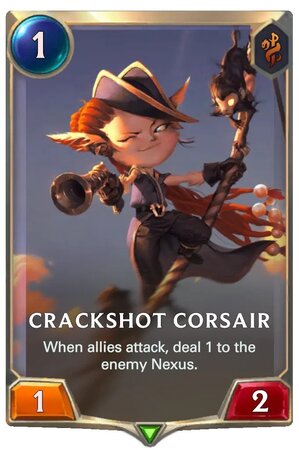
- Crackshot Corsair: Crackshot Corsair is a great complementary unit. We’re happy to have it alongside other 1-drops, but on its own, it’s fodder to any unit with two health.
- Legion Rearguard: Legion Rearguard’s 3/2 statline is absolutely premium against decks without 1-drops. It’s the ideal pick for Vile Feast/Pokey Stick. We’re perfectly happy trading into a 2-drop or Mystic Shot. What doesn’t feel great is attacking into a 2/1.
- Legion Saboteur: Legion Saboteur has the highest damage potential, but is also very fragile. One unblocked attack hits for three and threatens another point of damage on the next attack token. It’s very weak into Vile Feast/Pokey Stick unless it’s attacking on turn one. We’re content trading into other 1-drops since we still get to attack for one damage.
In general, we ideally want the triple 1-drop hand. We’ll often settle for any combination of three (except 2x Annie), but we don’t always have that luxury. Using the above descriptions, we should have a better idea of what to aim for. If our only 1-drop fares poorly in the matchup, toss it to try and find something better. When we do have multiple 1-drops, use that knowledge to determine which one gets played first.
Aside from our 1-drops, there are only two other cards worth considering in the mulligan. These two give us some of our highest damage potentials, but there are situations we can’t afford them.
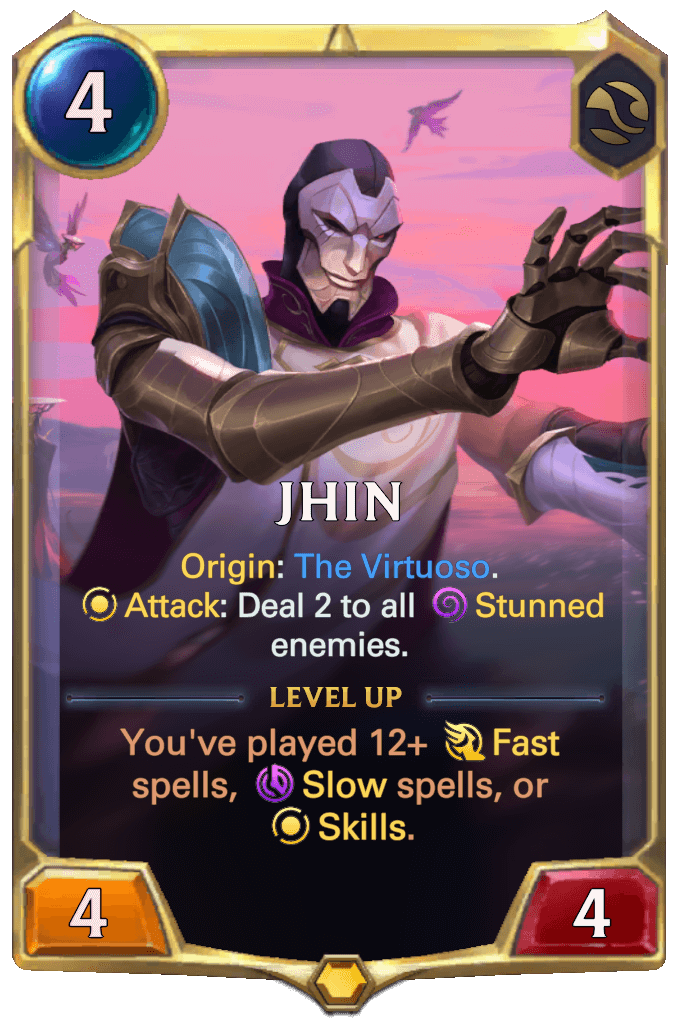
- Jhin: So long as we’ve got at least one reasonable 1-drop, it’s always worth keeping Jhin. We want as much additional damage as possible, so start stacking up those Lotus Traps. If the other three cards are bricks, it’s probably best to toss all four (including Jhin) in hopes to find at least one suitable 1-drop.
- Boomcrew Rookie: Boomcrew Rookie is one of the strongest cards in the deck. It can very easily represent at least four damage against most archetypes with basically no commitment. However, if the opponent is packing 2-mana 3|2’s, Boomcrew is not worth keeping. And just like Annie, avoid Demacia. Broadwing is a heck of a card.
Example Hand 1: Annie – Legion Rearguard – Legion Rearguard – Boomcrew Rookie
Example Hand 2: Crackshot Corsair – Legion Saboteur – Legion Saboteur – Jhin
Gameplay Strategy
As mentioned before, the order in which we develop units can make a huge difference. If we have two of the same 1-drop, it’s often best to play them back to back in order to reveal less information. If we imagine which spells or units they could play, we can sometimes bait them into a mediocre answer that gets punished by our follow-up.
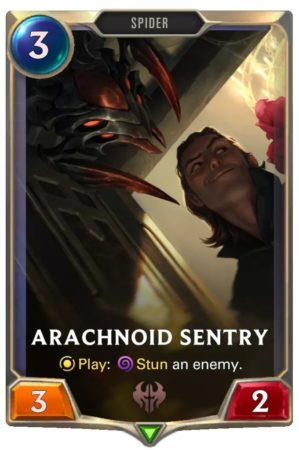
It’s extremely important to weigh the board state and the opponent’s potential answers. Certain cards like Arachnoid Sentry can be massively punishing when we decide to develop. Similarly, giving the opponent a chance to remove Crackshot Corsair, Legion Saboteur, or Boomcrew Rookie pre-attack can be game-losing. However, not developing can also greatly reduce our damage potential, as we’re limited to the units on board.
Knowing whether to develop or open attack comes with experience. If our hand is full of burn spells and there are few enemy blockers, it’s probably worth open-attacking to secure the damage. If we’re holding units that need to attack, flood the board as wide as possible! One thing to remember is it’s a lot harder to deal combat damage past the first few turns, so take the opportunity when it’s given.
Annie Jhin has an absurd amount of burn available. While the deck has its aggressive draws, they aren’t 100% required in order to win the game. We want to always be aware of the damage available in hand, and how much more we need to find. Don’t be afraid to block when needed in order to buy more time.
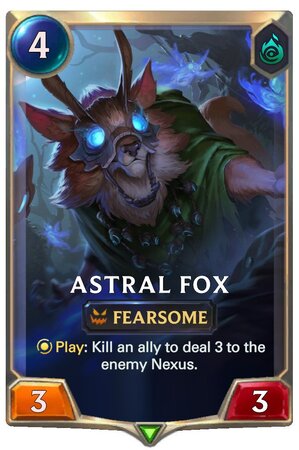
Okay, so I know you’ve probably been waiting for me to address the elephant in the room… Or should I say fox?
Astral Fox is a fantastic addition to the deck that provides much-needed, additional burn damage. It may cause some clunky hands at times but greatly increases our burn count. Unlike Imperial Demolitionists, we do have to fully sacrifice a unit, making it best to play post-combat. We also have to be careful when playing it, so try to find windows where the opponent taps under their interaction.
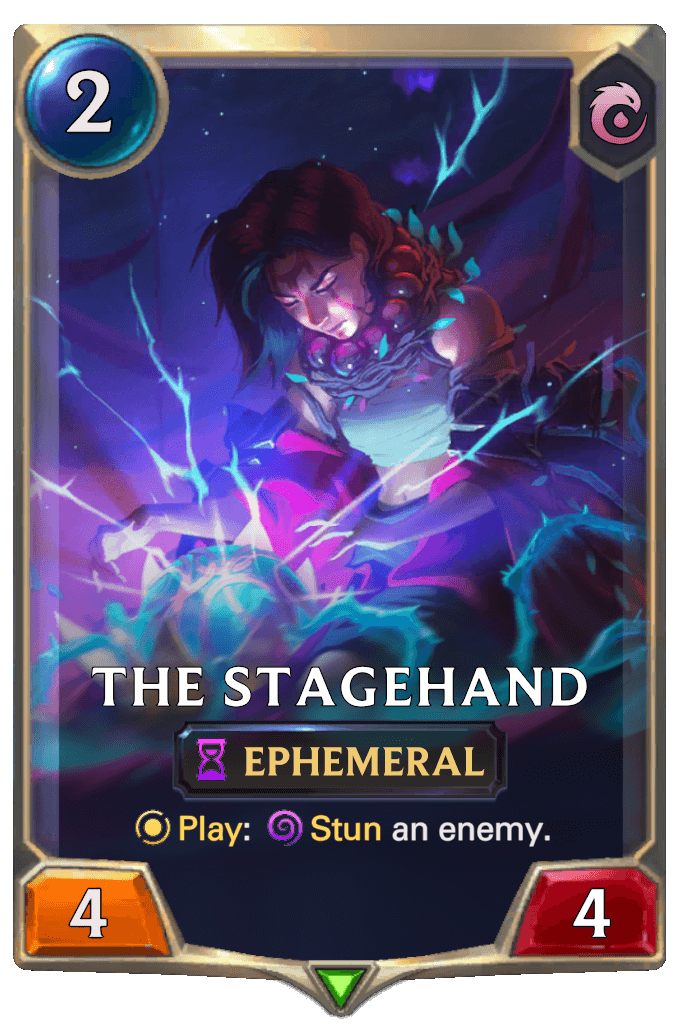
The Stagehand is a powerful new card that can single-handedly deter the opponent from attacking. That being said, unless your life depends on it, NEVER use The Stagehand defensively. Let the Challenger unit kill Annie. Seriously, it’s fine.
A 2-mana 4|4 that Stuns an enemy unit is crazy powerful on offense. This allows us to go wide during turns 3-5 and force the opponent into some really tough blocks. And when The Stagehand attacks, so should everything else! Send in that Crackshot Corsair. If they decide to block it instead of The Stagehand, we’re laughing.
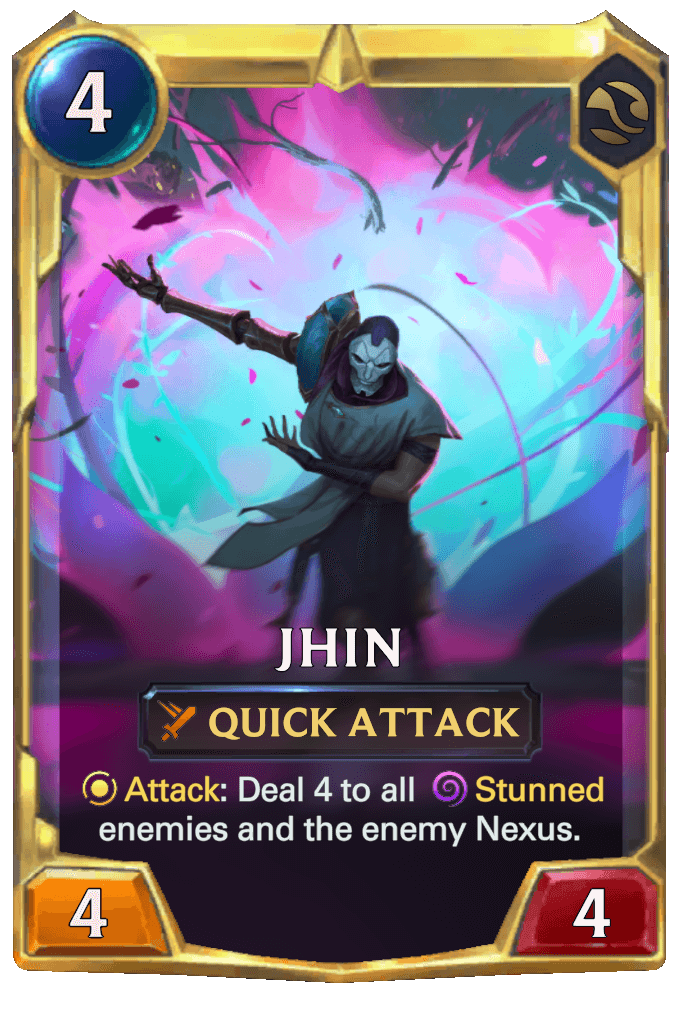
Jhin is a complex champion. While it won’t always be relevant, pay close attention to the Origin triggers. Depending on how we sequence things, Jhin’s Deadly Flourish skill can trigger before or after the Lotus Trap. That’s the difference between dealing two damage, or zero-damage, to their weakest enemy.
One key interaction to remember is that Crackshot Corsair will always pop first. If Crackshot Corsair is on board and Jhin’s Origin is two out of three, the Lotus Trap will be added to the stack, followed by Deadly Flourish (stacked on the left). In this case, we miss.
When Jhin is in play and the Origin is two out of three, we can develop a unit that triggers a skill on play (Tusk Speaker, Doombeast, etc.) and stun an enemy unit on the same action. That’s a huge difference compared to triggering the Origin on attack, as the about-to-be-stunned unit can still “ghost block”. This essentially turns our units with on-play skills into Arachnoid Sentrys, and will open a gap to strike through to the Nexus!
General Tips
When playing against Drain or Lifesteal, save Noxian Fervor to help deny the healing.
Against Ionia or Shurima, try to get the opponent to tap under Deny/Rite of Negation mana before casting Decimate.
When your only hope of winning is a Noxian Fervor off the top, make sure you’ve saved a unit on board in order to cast it. This could mean taking extra damage in order to keep one thing alive.
Doombeast’s Nightfall requirement can be occasionally difficult to manage. Keep this in mind when playing off the top of the deck. Sometimes it’s better to hold back a card so that Doombeast can be played the following turn.
Other Considerations
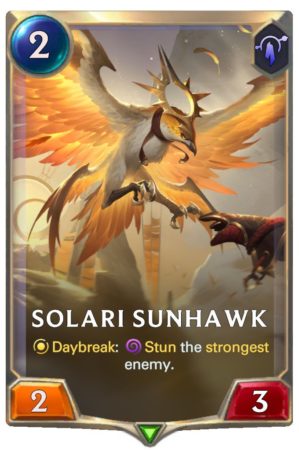
Solari Sunhawk x3: While there are times this card feels pretty good, most of the time it’s pretty subpar. The Daybreak restriction can make this card really awkward, and just doesn’t threaten enough damage on its own. It’s a fine 1-of, but would be my first cut if I were to include anything else.
Arachnoid Sentry: No, just no. I’ve always been fond of Arachnoid Sentry, but this isn’t the deck for it. There are times where aggro decks play it as a 1-of or 2-of, but why would we need to when we already have The Stagehand?
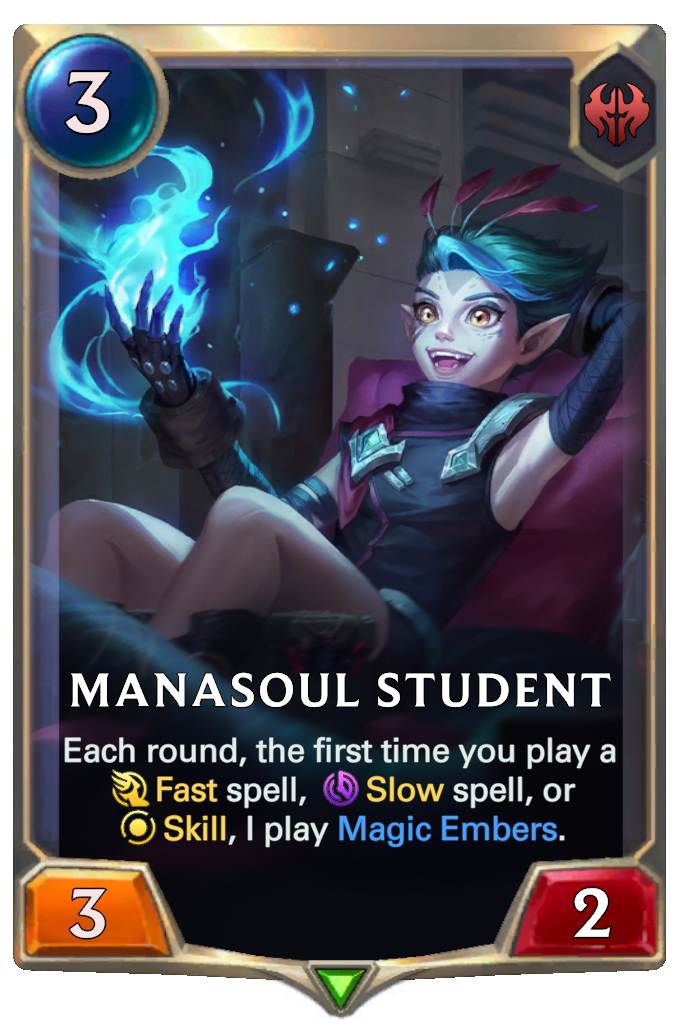
Manasoul Student: It’s a neat card that can stack up a lot of damage. However, it’s just too slow and fragile. Having this die to a Mystic Shot feels awful, and we have many better burn cards already.
Shugo’s Productivity Thought of the Day
When we find ourselves feeling trapped in a difficult place, try to get out of the box.
Staying within the same frame limits our scope of reality. Looking out the window will help broaden our perspective.
For more decks, head to the Deck Library! To build your own, head to the Deck Builder.
Subscribe to our newsletter:
Don’t miss out on all of the latest LoR content!