League of Legends
 Teamfight Tactics
 Legends of Runeterra
 Valorant
 Lost Ark
 Destiny 2
 Diablo 4
 Download APP
 Collapse
How to Trade in Valorant
Welcome to the third episode of your favorite Valorant tips & tricks series “How to Valorant”!
Within this series, you can learn all about the different existing kinds of mechanical and tactical gameplay mechanics that are crucial to the game.
As always, our primary goal is to help out everyone interested in becoming a better player and thus the focus of this particular series is on explaining the respective gameplay topics in great detail but still in an understandable and easy-to-learn way.
This specific article will be all about how to “trade frag”!
The topics we’ll be covering are:
- What Is Trading in Valorant?
- Example From A Professional Matchup
- When And How to Trade Correctly
- Advantages of Proper Trading
If you find yourself enjoying this article, be sure to also check out our first episode of “How to Valorant” on how to crossfire in Valorant or the second episode containing everything you need to know about Valorant flash abilities.
What Is Trading in Valorant?
The term trade fragging, oftentimes just called trading, describes a method to always be able to make up for the death of a teammate with the frag onto the enemy who killed that teammate.
Compensating for the death of a fallen teammate by immediately killing an enemy in return can be viewed as a one-for-one trade regarding the overall numbers of living members of both your team and the enemy team. That’s the origin of the term trading.
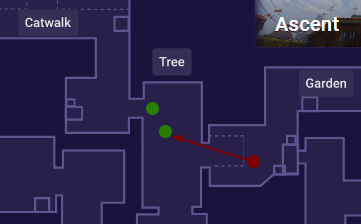
Here’s a simple illustration to explain what is supposed to happen in a successful trade:
Step 1: Stay in close proximity to your teammate playing entry
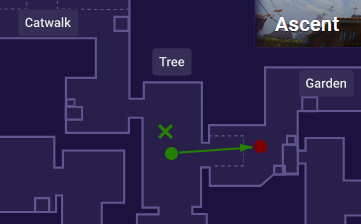
Step 2: Be always prepared to react in case of your teammate losing the initial duel
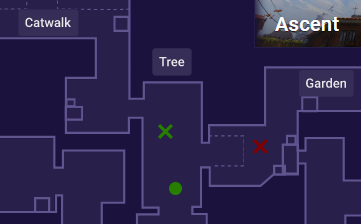
Step 3: Trade the enemy who just killed your teammate
It basically only describes what’s happening or is meant to happen in-game and therefore is a very intuitive term to use for players at all skill levels.
Although trading itself isn’t really a complicated concept, sometimes it’s not as easy to practice as you may think. And it always helps to look at vivid examples to internalize certain things a little bit further.
That’s why we are now going to have a brief look at an in-game scene showing a perfect showcase for effective trading.
Example From A Professional Matchup
The following in-game scene comes from a pro matchup of the first VCT 2021: NA Masters tournament between Team Envy and Gen.G Esports.
To be completely honest, you don’t have to look far to find typical examples for trading in actual matches. All teams do it consciously or unconsciously on countless occasions in the game. This is just a simple example without further meaning.
However, it takes real skill to consistently and purposefully make use of trading to maximize your chances of success in every situation.
And maximizing your chances with effective trading is exactly what Gen.G did in this particular round.
Therefore, we’ll carefully pick this round apart in its pieces with an extra eye on the happening trades within the round:
[1:39] Gen.G decides to do a relatively fast A Split in this round
Since they do an eco round and thus only have pistols, they try to stick in groups and overrun Envy
[1:27] The first trade takes place on A Short / Lamps
Shawn satchels towards lamps and gets killed by mummAy
gMd immediately trades mummAy → very important
[1:19] Another great trade for Gen.G close to the Showers entrance
The elevated kaboose can only utilize his high ground for one kill onto koosta
Again, MkaeL immediately trades him to balance out the numbers
[1:16] gMd continues to pressure the opponent by pushing Lamps and getting an additional kill back site onto FNS
Pay attention to the spacing between gMd and his teammate behind him: HUYNH would’ve been ready to instantly trade FNS if gMd lost the duel
Those initial two key trades alone enabled Gen.G to plant the Spike on the A site and start the afterplant in a 3v3 situation despite their obvious handicap of having an eco round and only pistols in hands.
Gen.G even managed to get an additional kill to make it a 3v2 situation in their favor and using this advantage they also won the round in the end.
All in all, effective trading brought Gen.G the victory in this round in spite of having the economical disadvantage.
On this account, this specific example should adequately show you how important and impactful well-played trading can be and that even the best of the best still struggle against teams that manage to trade frags in a consistent manner.
When And How to Trade Correctly
Trading is a tool you can and should keep in mind at any point in time whilst in-game. However, it certainly is more useful in certain situations compared to others.
Here is a compact list of situations in which trading can help you immensely to keep the upper hand over the round:
Situations in which…
…your team managed to workout a numbers advantage (e.g. 4v3 in your favor)
…you want to take certain map control without unavenged losses on your side
…you intend to sacrifice a low-HP teammate for a full-HP enemy
…you want to retain the control over the situation in general
Those use-cases mentioned above are definitely not the only situations but surely one of the most common ones for players to attempt trading in.
So, now you know when to aim for effective trades. But how do you go for these trades the best way possible?
To ensure a certain trade, you basically have to stick to your comrade-in-arms at all times. A close proximity to your friend makes it complicated for your enemy to escape the situation after the first duel.
In case the opponent wins the initial aim fight, he mustn’t be allowed to flee without punishment. That’s why you have to be able to trade immediately in most scenarios.
There are only a few exceptions to this rule. For example, if the position of the second challenger is unknown and the enemy, therefore, doesn’t expect another duel, you can easily take a little bit more time to find the perfect timing for the re-frag.
Agents who can escape a confrontation with one of their abilities (e.g. Jett’s Tailwind and Reyna’s Dismiss) have a huge advantage in this regard because of the way trading works.
These agents are able to get entries without the enemy being able to trade. This is one of the reasons why both Jett and Reyna are popular picks for the duelist slot in many compositions.
Also, Yoru is capable of getting out of a situation at any time using his Gatecrash ability. It’s going to be exciting to see if Yoru gains in popularity after the recent buffs in Patch 2.06.
Advantages of Proper Trading
The advantages of trading are pretty straight-forward:
- Multi-kills on the side of the enemy are unlikely
- All players in the team know how to proceed in the round
- Low-HP players can still have great impact for the team
- Numbers advantages can be obtained throughout the round
As you may already noticed, these advantages naturally go in line with some of the most common use-cases which were displayed in the section above.
Generally speaking, effective trading makes life difficult for the opponent who searches a way to turn around the situation in their favor.
Nevertheless, trading cannot replace getting entry kills. Instead, it can help to retain the resulting numbers advantage until the very end and thus the round win.
Conclusion
In summary, trading is an incredibly powerful tool you are better off to have in your personal repertoire.
Besides the obvious required mechanical skill, reliable communication and a solid understanding of teamplay is needed with every player of the team to consistently pull off successful trading.
In spite of all, only practice creates masters and to assume that you suddenly master trading after reading this article is probably going to turn out to be a misconception.
Just try to keep trading in mind as a possible way to achieve your goals mid-game and remember to communicate with your teammates when you intend to trade in specific situations.
To find the best positions to set up trades, check out our Valorant maps tool. We recommend coordinating with your 5-stack!